Architectural Photography

Photographing the historic Sun Theater in St Louis, MO

A few weeks ago I packed up the gear, took a way-too-early flight out of Los Angeles and landed a few hours later in St Louis, where I would be photographing the recently-restored Sun Theater for the St. Louis based architecture firm The Lawrence Group. 

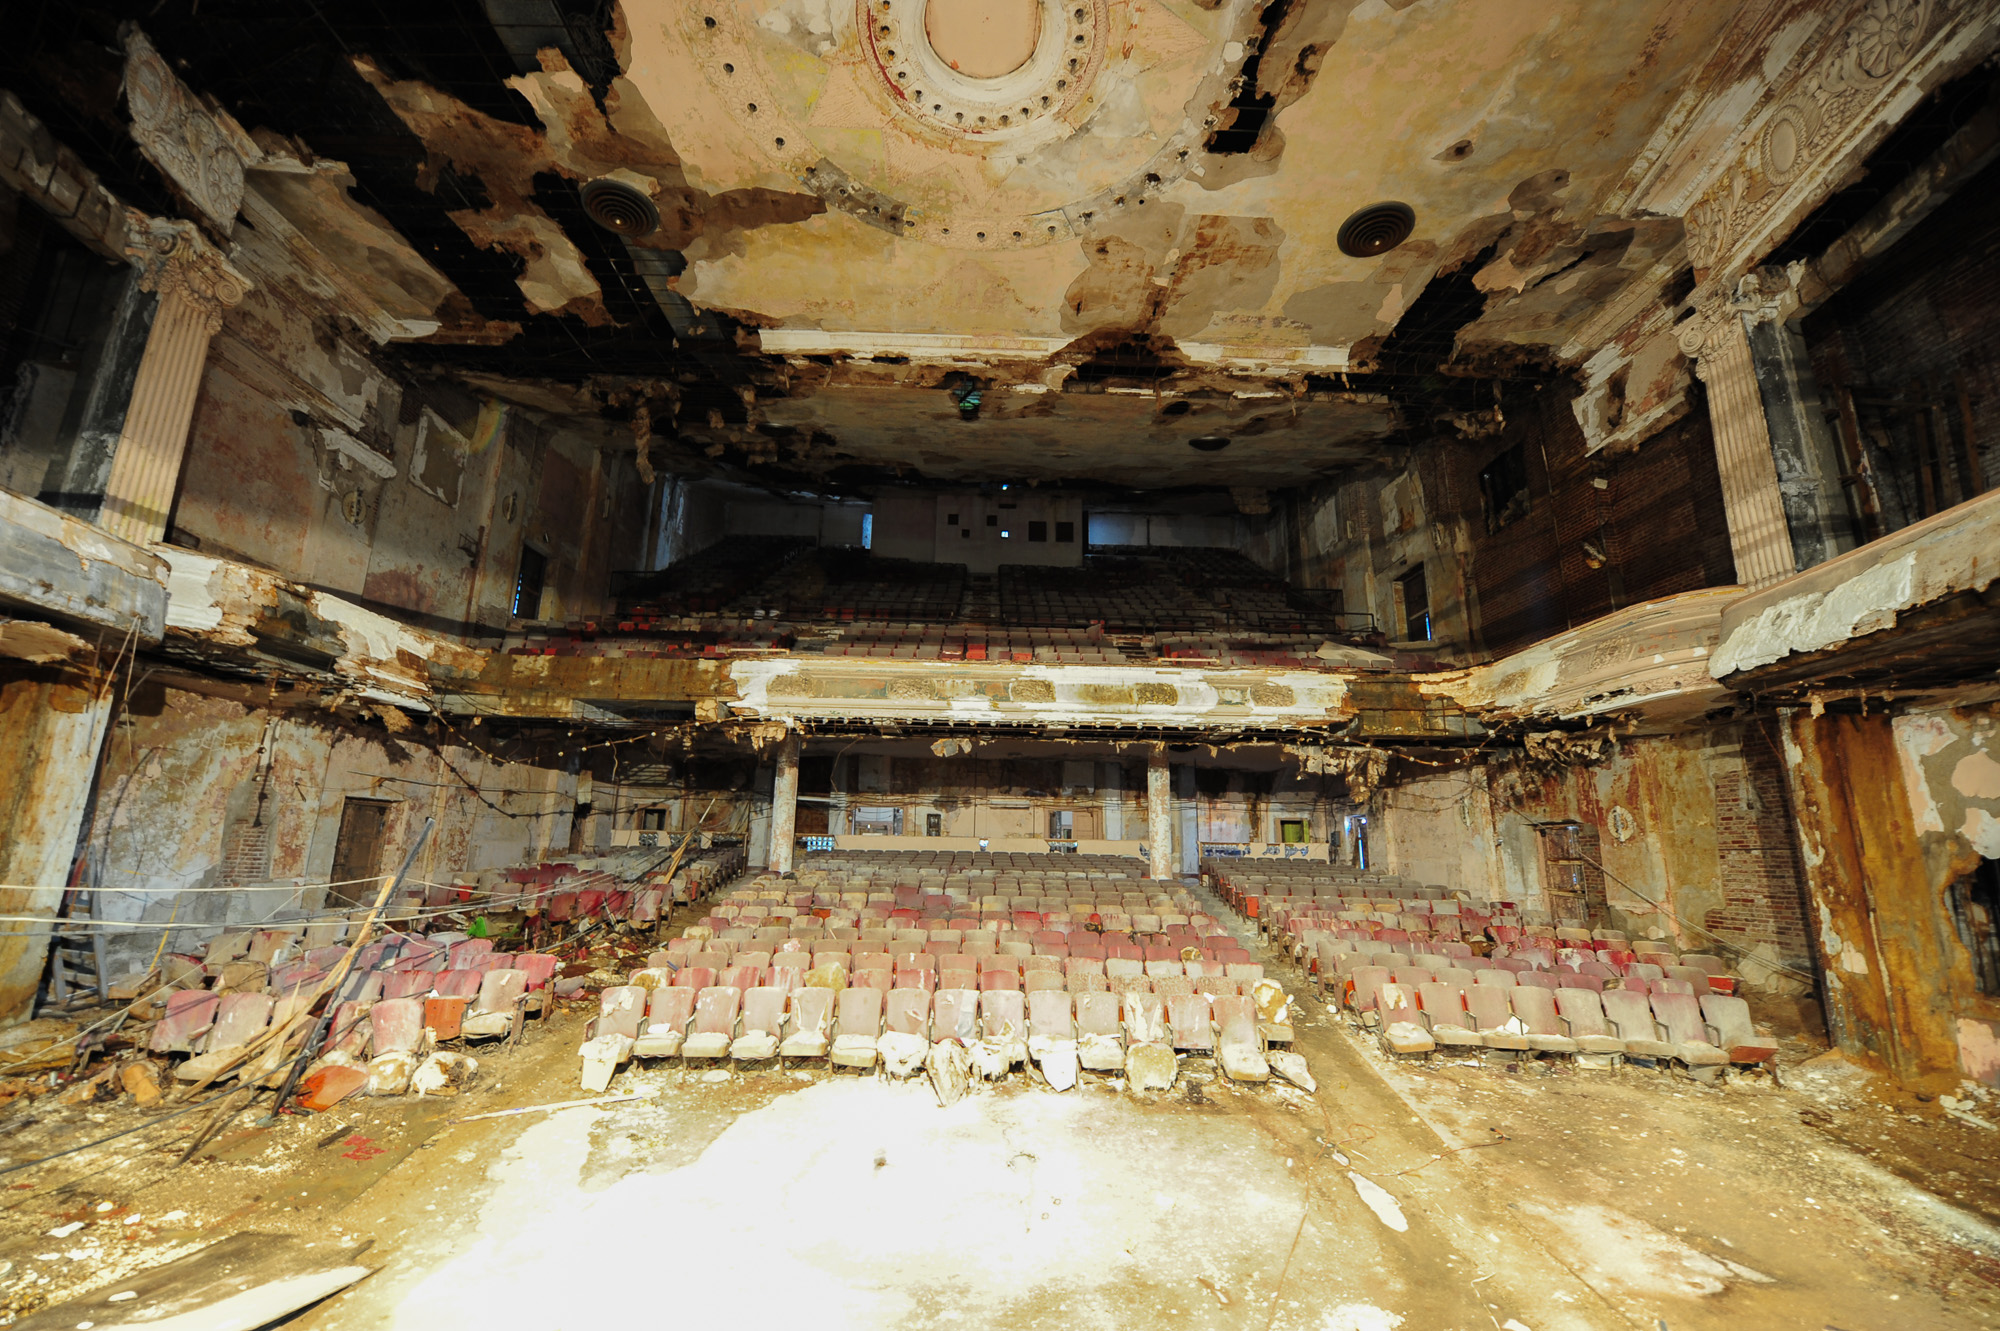
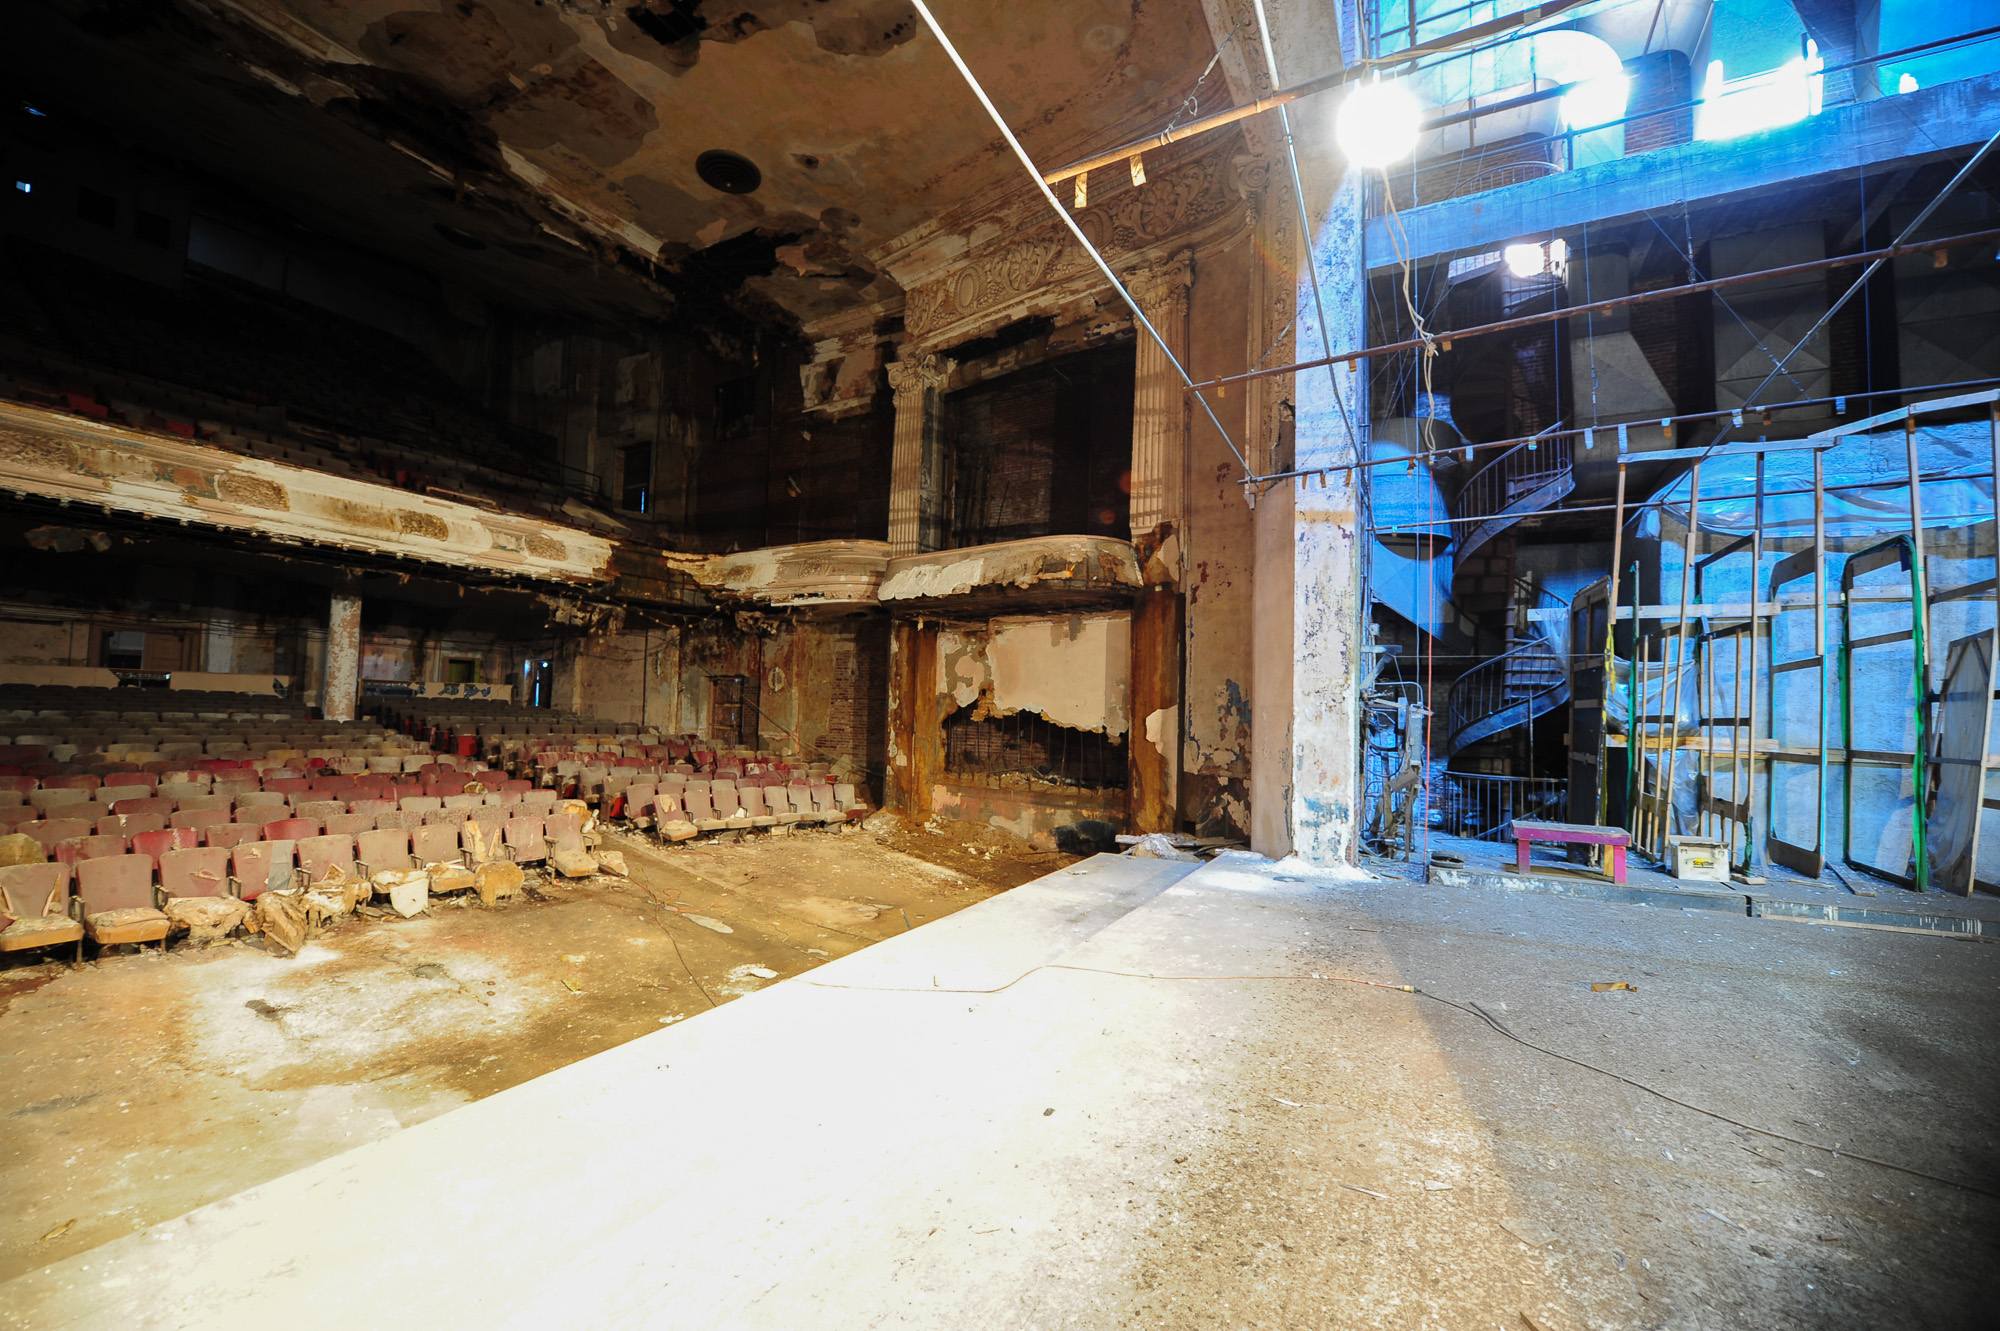
The Sun Theater has a long and storied history - first opened in 1913 as a theater for German-language plays, it went through a number of changes over the years - from playhouse to movie theater to men's club and just about everything in between. Roughly 40 years ago, it was left abandoned as demand declined and other theaters competed. During this time, the building was left exposed to the elements: countless freeze-thaw cycles, a roof that leaked like a sieve, and of course the damage caused by local troublemakers. Pieces began to fall off, walls began to collapse, and nature began to take a toll on the building.

In 2010, a new school was founded near the old Sun Theater. The Grand Center Arts Academy, which caters to grades 6-12, moved into nearby buildings. With a curriculum focused on performance and visual arts, the GCAA had a vision of restoring the theater to its former glory for use as both a performance venue and classrooms. Over the last five years or so, they worked with The Lawrence Group to study the building and assess the feasibility of restoring it. According to Aaron Bunse, the project director at The Lawrence Group, the building's bones and foundation were solid as a rock. The building, he said, was built like a tank, and most of the damage was cosmetic. A restoration was definitely feasible, and in January of 2013 renovations began. After a little more than a year and roughly $11.5m were poured into it, the theater has undergone a major upgrade and the results are simply stunning.

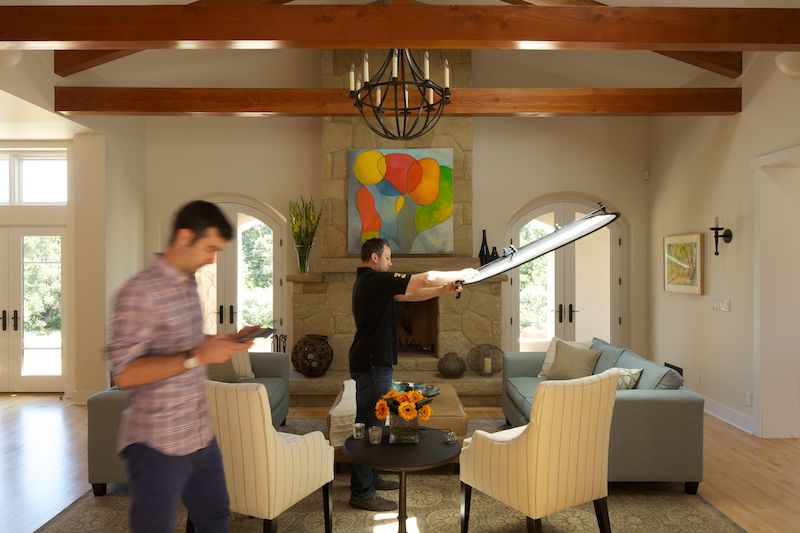
The Lawrence Group hired me to create a series of photographs showing the updated Sun Theater, and over the course of three days (two shoot days and a scouting day) we made seven images: two exterior twilights and five interior photos. Let me be honest, when you walk in this place, it is absolutely breathtaking. I've never seen a theater with such a juxtaposition of modern amenities and early 1900s detail. The restoration that went into this is simply jaw-dropping. Capturing it proved to be both tricky and rewarding. As usual, the biggest challenge was lighting. Switching breakers on and off, adjusting dimmers, adding light and removing light. Every shot took a fair bit of lighting work, which isn't out of the ordinary, but when you're dealing with a space of this size, it sure is exhausting! 

I've gone ahead and with the permission of my client, used a number of their 'before' pictures, so you can see how the theater looked before undergoing restoration compared to my photographs of the finished theater.

This is the view when you first walk out into the upper balcony area. An enormous stage flanked by a golden proscenium and a striking yet calming blue color palette to contrast it.

Many thanks to Aaron Bunse of The Lawrence Group who graciously let me use the 'before' images, on the left, to compare with my 'post renovation' finished images on the right. You can click each thumbnail to expand the images to a larger size.

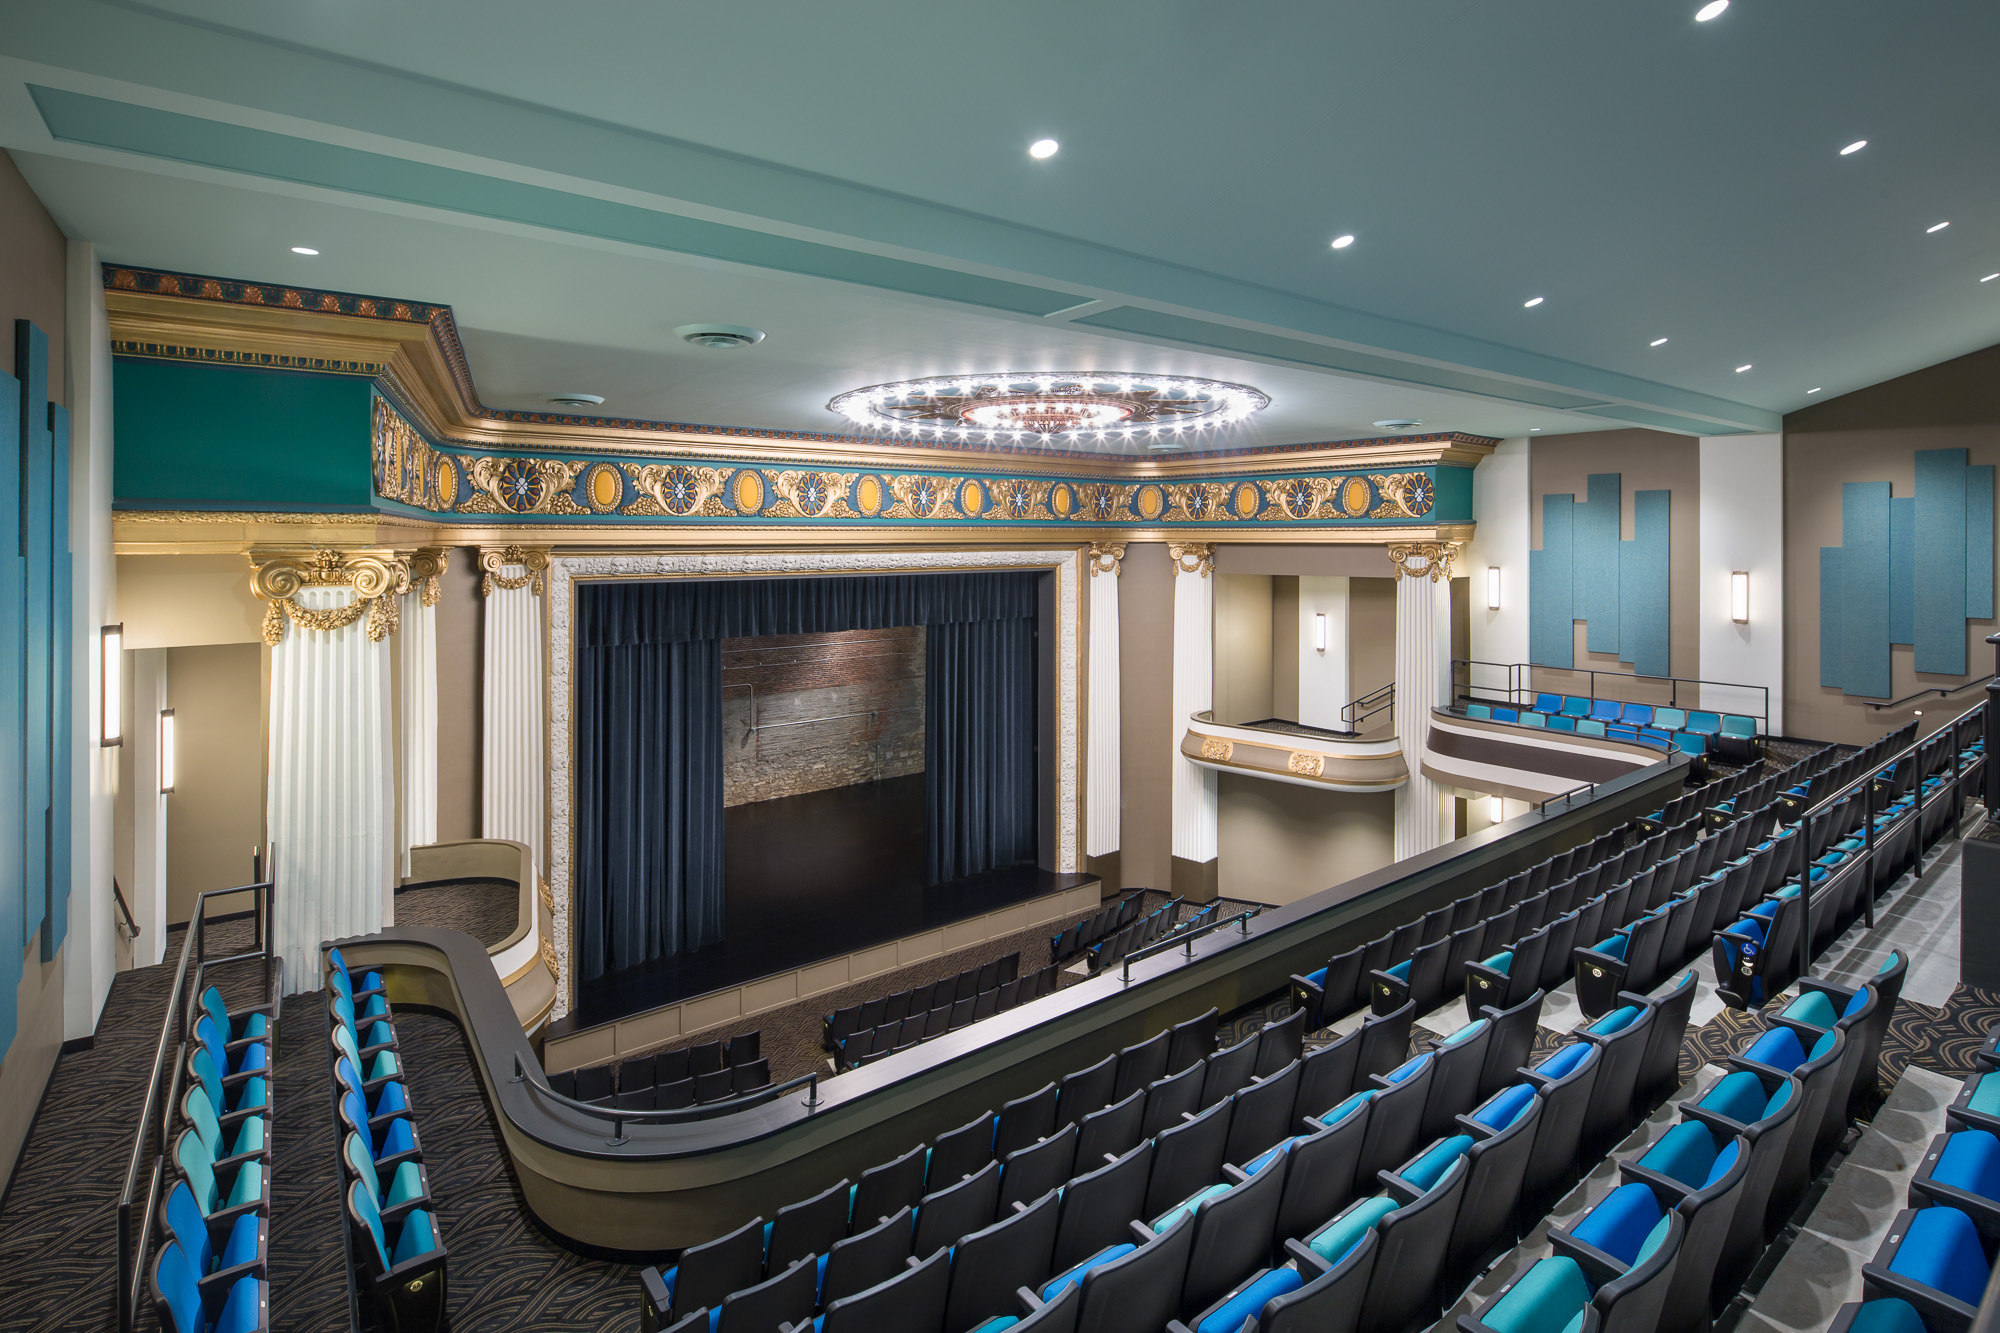
Looking across from the balconies, you can begin to appreciate the amount of restoration work that went on here. Much of the plaster work across the proscenium was destroyed over time, and it was all restored by hand using the same methods that were used to install the plaster back in 1912-13.

Standing on the stage, you get to see just what an incredible transformation the place underwent. I'm in love with the colors they chose, as well. I can't imagine being a high school student and walking out to this - nerve wracking! From this angle, you can also see how they redesigned the building. They removed a few hundred seats to add classrooms behind the far rear wall, providing the students with more than just a huge concert hall. There are rehearsal rooms, standard classrooms, and small amphitheater-like rooms for small ensembles to play in.

From the back of the stage, the scale of the building becomes evident. The Sun Theater was built with a huge backstage area, with a flywall tall enough to accommodate multiple stage backdrops and plenty of rigging. 

In the front, the entryway is no less beautiful than the rest. Marble floors and hand-made plaster moulding make for a pretty grand entrance. Much of the smaller details were re-created by The Lawrence Group simply by hand and drawing in details, then brainstorming to figure out how to reproduce it. So much of the plasterwork had been lost to time that in many places, educated guessing was the only way to go.

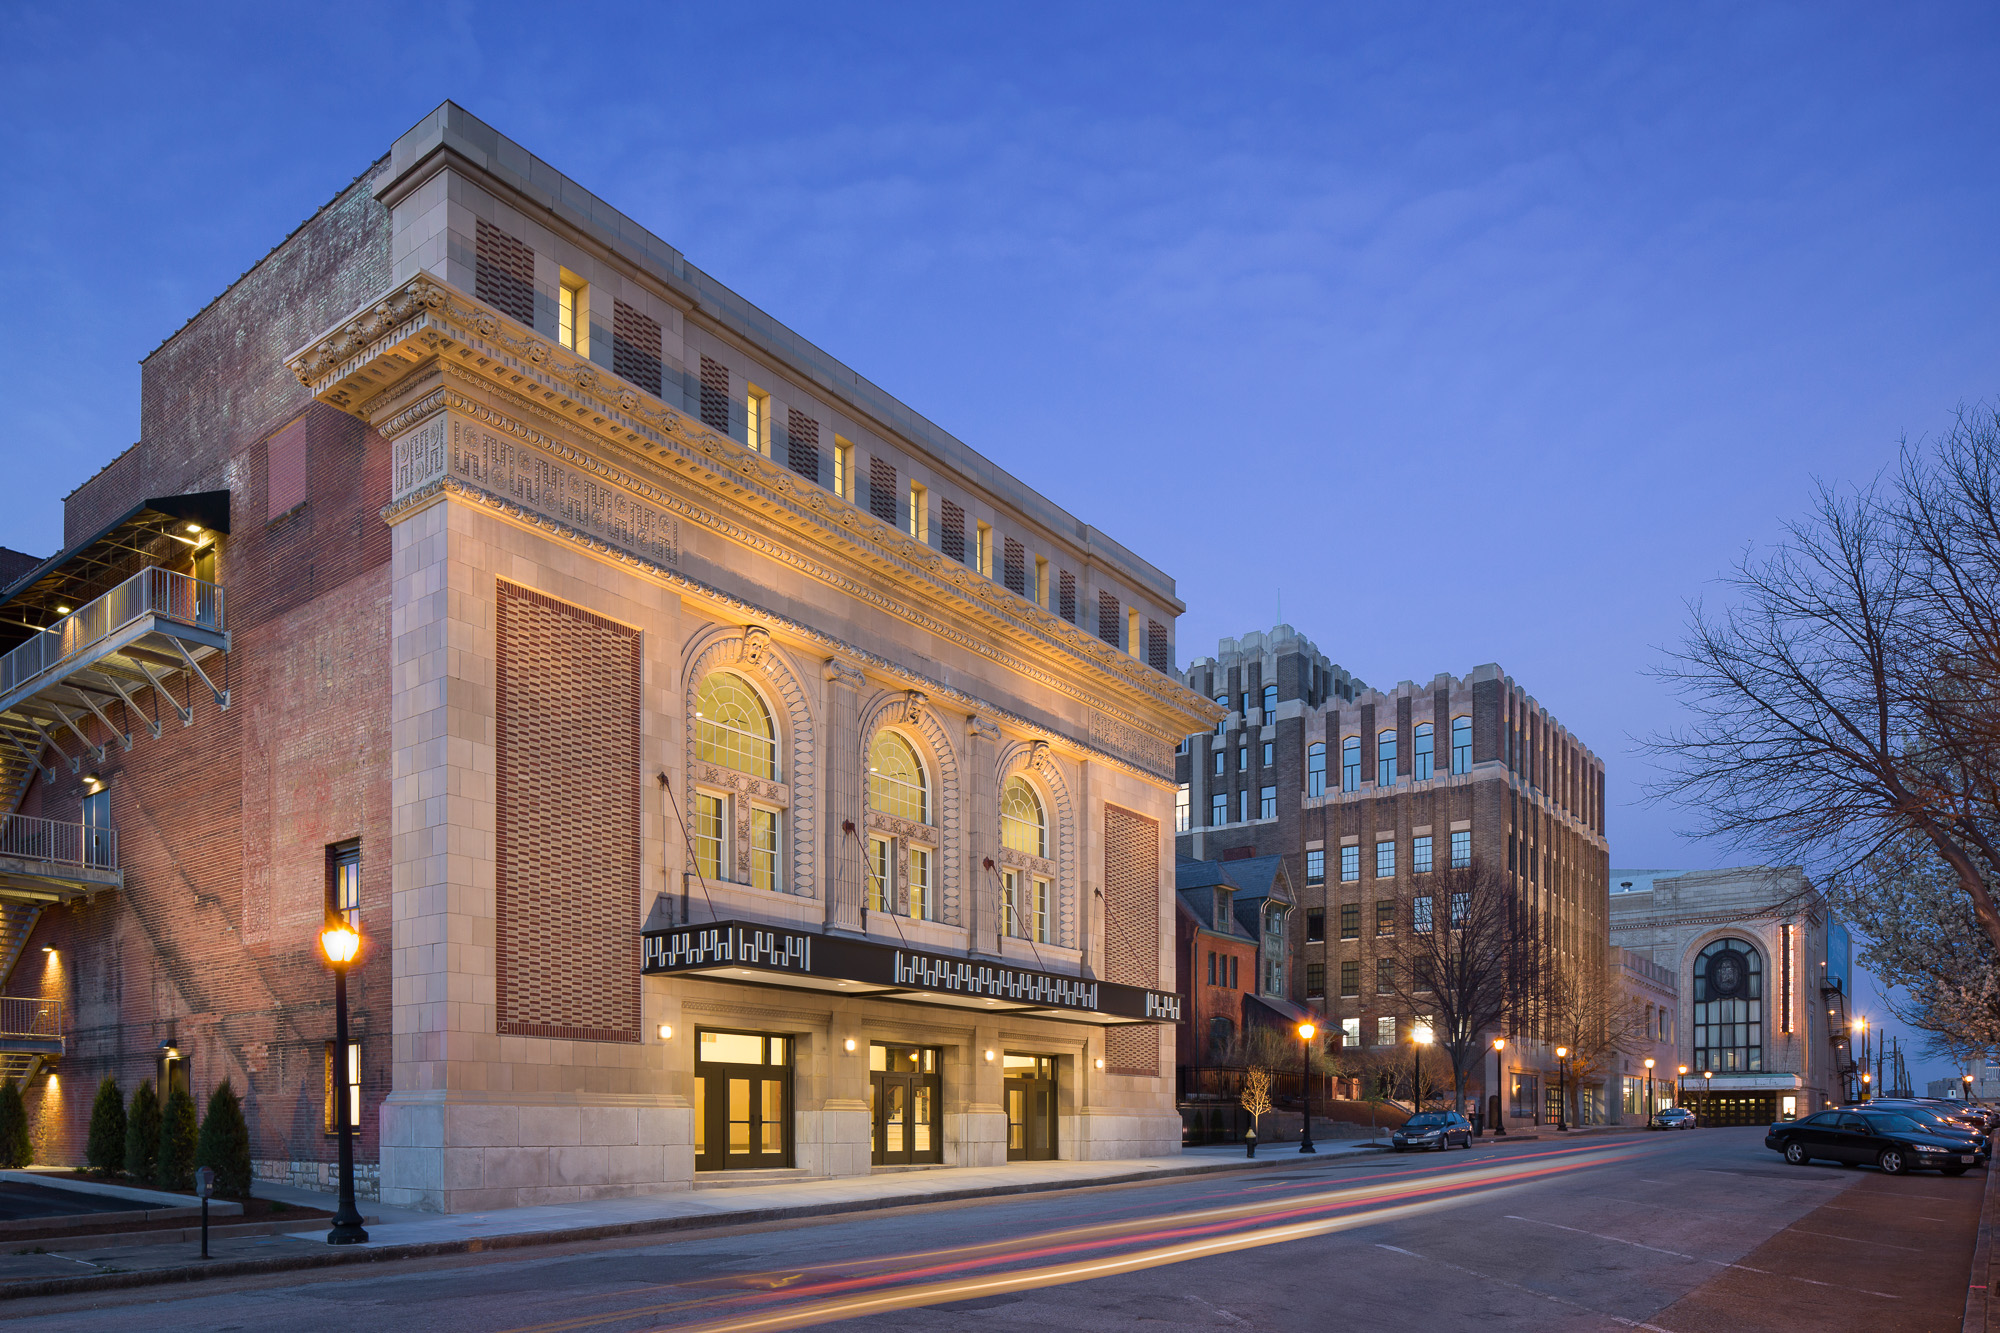
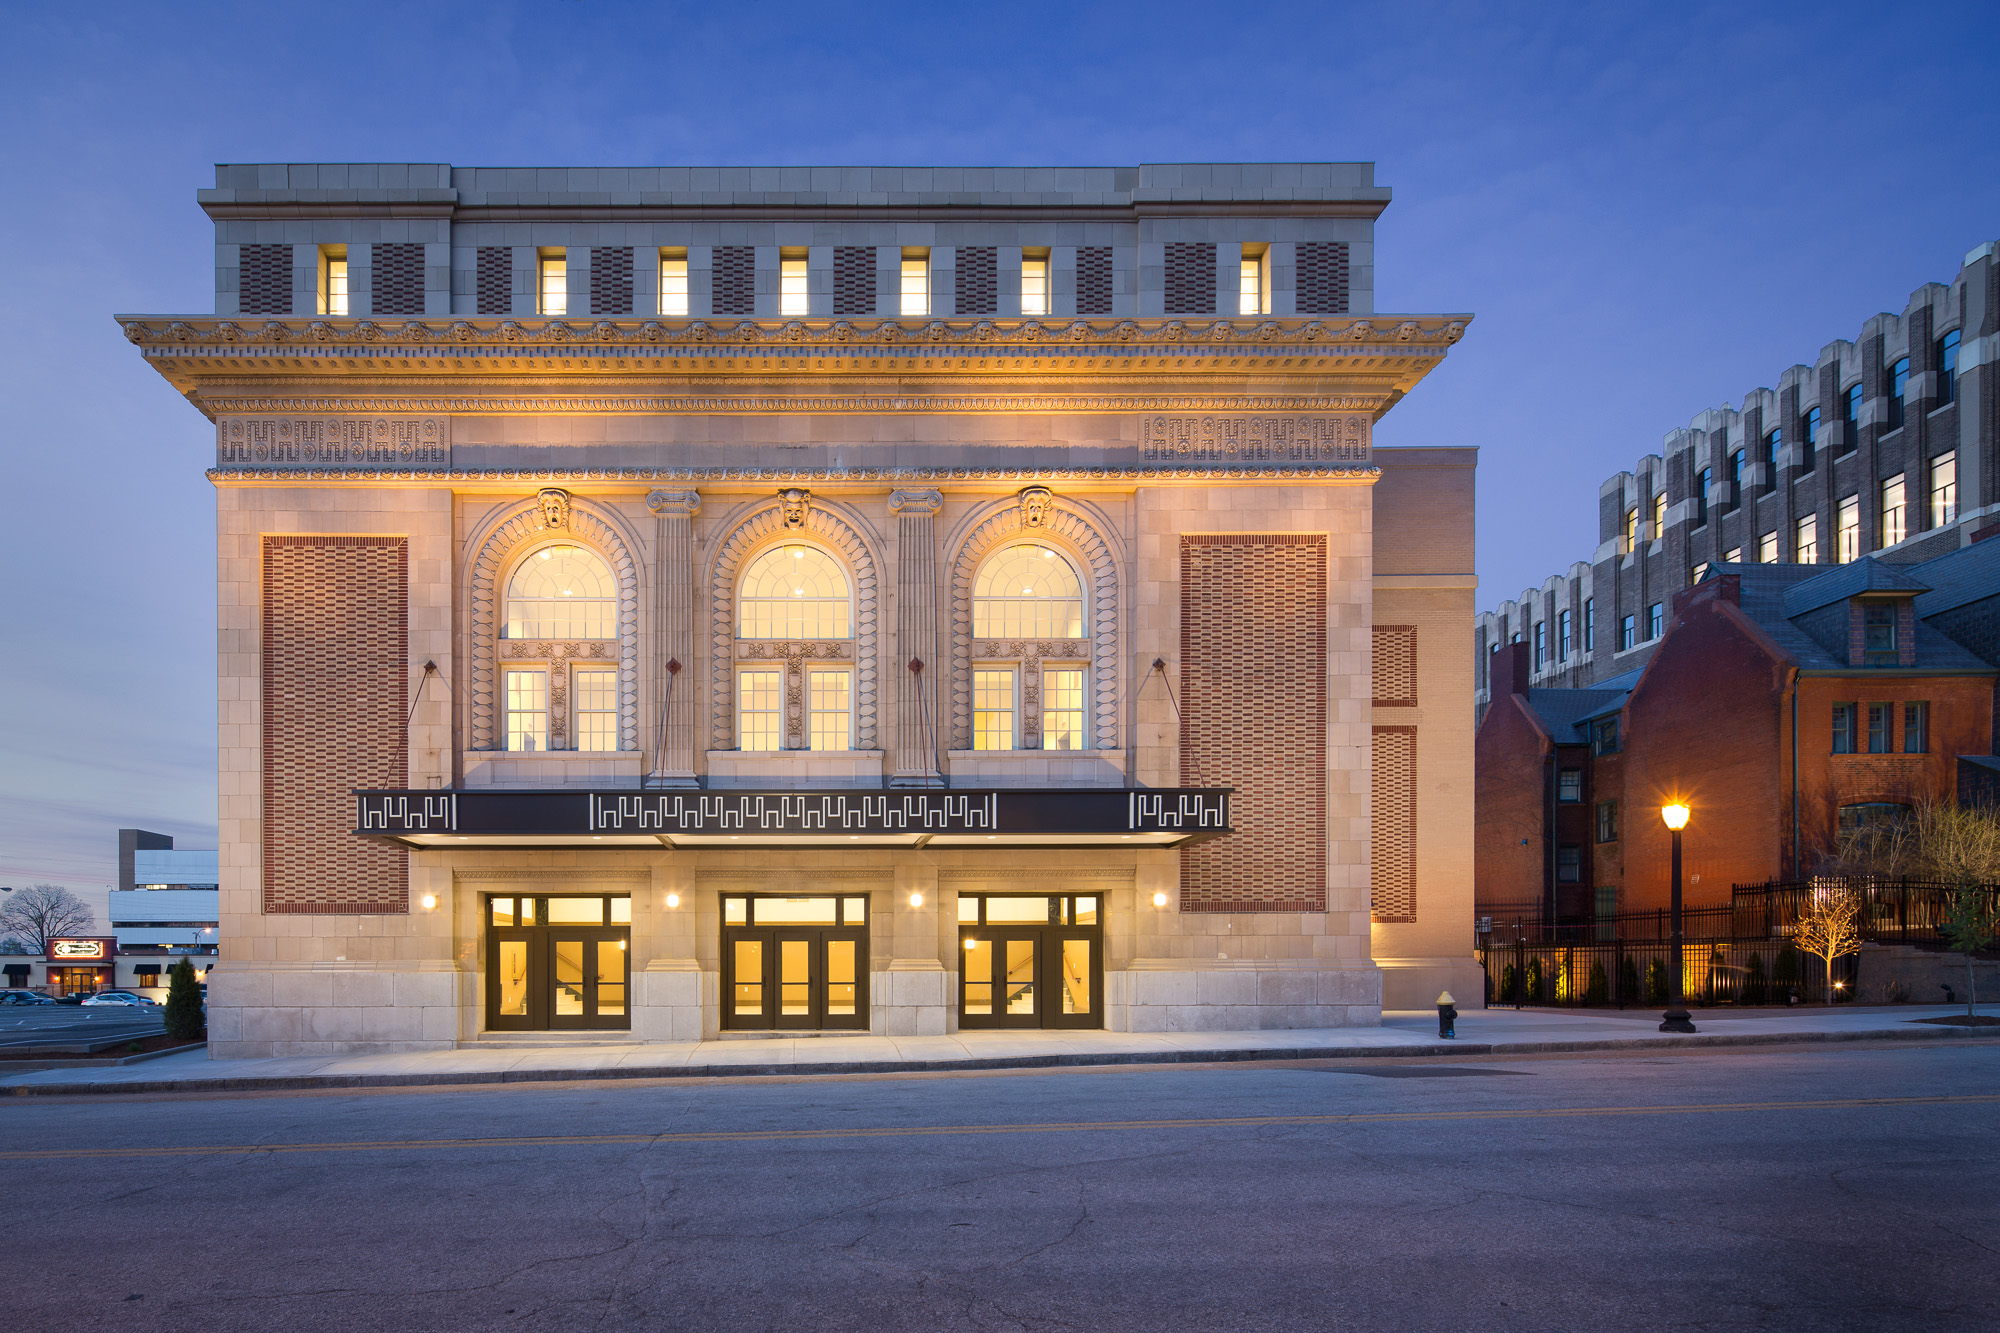
And outside, the front facade has been impeccably restored. From this angle, you get a sense of the context in which the Sun Theater is placed. To the right, the rest of the Grand Center Arts Academy campus can be seen, as well as the theater scroll for the Powell Symphony Hall, another St Louis mainstay.

After three days of shooting, I was absolutely spent. Once I landed in Los Angeles, I think I slept for a good 12 hours after all was said and done. It was a hell of a job but I am so thrilled with how the images turned out. I can't speak highly enough of The Lawrence Group and their work on this project. It was also an incredible honor for me to be chosen to photograph this job - with so much history and so much excitement riding on the line, for both the people of St Louis and the school kids and staff at the GCAA. I felt really lucky to have been a part of it - and hope that these images can be enjoyed by everyone who helped on the project.

For a great little piece on the Sun Theater and its restoration, check out this Youtube video below:

When all is said and done, I'm absolutely thrilled with this project in every way. It was so great to be a part of this project, even if in just my own little way, and I'm really looking forward to adding these shots to my portfolio. It's been a crazy few weeks here, and it doesn't show any sign of slowing down, so expect a few more posts in the coming days, and many more travel gigs lined up this summer so plenty of meaty blog posts to come.

Photographing Fig House: Los Angeles' Coolest New Event Space

It's true: I get to see some seriously cool locations. One of my favorites has to be the recently completed Fig House in Los Angeles. Located in Highland Park, Fig House touts itself as a bespoke events venue, catering to a wide range of clients; they do everything from weddings to corporate parties to photoshoots and everything in between. Fig House is exciting and fresh, and a definite change of pace from what I usually shoot. With an eclectic mix of styles (everything from 1920s Hollywood to art deco with modern LA touches) it was a nice challenge to capture it all. I absolutely loved all of the color and variation throughout the space. 


I opted to shoot this in a more natural light style - this place just came alive with color owing to the huge sliding glass door windows emblazoned with stained glass by Judson Studios. Since the design was full of color and a mix of styles, adding a ton of light wasn't going to do any favors: it would only make the scene busier. I'm all about lighting to the space - and what that space calls for in terms of photography in order to make it look the best that it can.  No need to reinvent the wheel if you don't have to, right?

Next door to Fig House is Roomforty, a catering and restaurant service with a charm all it's own. While this was merely an accesory to the Fig House shoot, I absolutely loved the decoration and design of the tasting room, where potential clients can get a taste of the food made right on site or friends can gather to have a private meal of their own during a function at Fig House. 


And of course, what blog post would be complete without mentioning the perks of being an architectural photograhper? Roomforty's food, as expected, was absolutely jaw-droppingly delicious.


How To Photograph Real Estate, Interiors, And Architecture: Where Art Meets Architecture

After over six months in production, I am happy to announce that my tutorial 'Where Art Meets Architecture: How To Photograph Real Estate, Architecture, and Interiors' is finally available! I partnered up with Fstoppers.com to create a comprehensive eight-hour tutorial which covers so many facets of architectural and interior shooting.  I wanted to give my readers and followers the first chance to purchase the tutorial, which is available for $299 (click here), before it goes open to the public, pending Fstoppers.com's migration to a new server this week.

I will explain each and every technique that I use to produce my photographs. The full photography tutorial is broken down into three chapters, each covering the tools necessary to succeed in the different niche markets within the field of interior photography. So no matter if you are an experienced photographer or have never taken your camera out of auto mode, I'll take you from shooting basic bedrooms all the way through my complicated light-painted exteriors. 

We've created a ten-minute trailer for the tutorial, which breaks down everything inside it and gives a brief look into my workflow, which can be seen here:


Here's what I cover throughout the tutorial:

Real Estate Photography: In the Real Estate section, I take the time to teach you everything you need to know about this genre so you can kick start your career and start producing images for real estate agents, listing agents, and general property management. All of the basics will be covered in this chapter including:

  • How to get started with minimal gear
  • How to bounce flash effectively
  • Using natural light to your advantage
  • Properly composing your frame
  • Choosing the correct focal length
  • How to retain exterior window views
  • Two, three, and four light setups
  • Correcting pincushion and barrel distortion
  • Fixing converging lines in Photoshop
  • Creating a final image completely in camera

 
In addition to getting started, I'll also talk candidly about how I have found success in the real estate market, and how you too can build a money making business shooting properties for sale.

Architecture and Interior Photography: This chapter focuses on how to create photographs for higher paying clients like architects, home builders, interior designers, and magazine editorials. With the ground work already laid down, I will focus on streamlining your workflow and pushing your images into actual works of art. While on location at an actual architect’s personal home, I'll take you step-by-step through eight flagship images from initial capture all the way through the final photoshop editing process. We have also included a full Photoshop PSD file of a twilight exterior images so you can follow along as we go through photoshop.

  • Twilight Exterior Technique
  • Advanced light painting and compositing
  • Tethering to an ipad/iphone
  • Using scrims  and flags to control reflections/specular highlights
  • The “Moody Interior Twilight Shot”
  • Faking warm sunlight
  • Staging furniture for strong compositions


Commercial and Advertising Photography
: In this final section, I'll take you on the set of two commercial spaces and demonstrate how to produce perfect images for restaurants, hotels, wedding venues, resorts, and other commercial clients. Emphasis will be placed on meeting your clients needs and lighting images according to the use of the space.

  • Creating twilight images while a restaurant is open for business
  • Incorporating people into your photography
  • Lighting multi room locations
  • Replacing details in Photoshop
  • Lighting large banquet halls
  • How to create an inviting atmosphere

 
In addition, I also touch on commercial project pricing, licensing, and dealing with clients in a way that keeps everyone happy and creative energy high.

If you are interested in purchasing the DVD, you can click here, which will take you to our e-junkie store, where it is available for $299, which in my opinion is a great value. I have watched it a few times and every time I watch it I think about what a steal it is! It took me years to figure all of this out and to hone my craft to the point that its at today. Unfortunately, my partner, Fstoppers.com has been absolutely slammed with traffic from a few of our posts that went viral, which we are working on getting fixed right now, and I am releasing this to just my loyal followers until it goes public at the end of the week.

I hope you like what you see - we've gotten a handful of glowingly positive reviews from watchers, which is great to see after all of the work that went into it. If you have any questions at all, feel free to shoot me an email or reply to this post and I'll get back to you!


Belgian Country Style Interior And Architecture in Pacific Palisades, CA

About a month ago we wrapped up photographing an amazing home in Pacific Palisades, one of Los Angeles' hidden and lesser-known neighborhoods. This home was all about the stories: from the reclaimed wood in the ceilings and floors, to the tiles that were imported from France and originally made in the 15th century, the house just exuded an incredible charm everywhere you looked. 

Shot over the course of two days, we created a series of about 10 staged and lit photographs and a number of portraits of the builder. This was without question one of my favorite homes that I've ever photographed - wherever you looked there was something worth shooting. There was no expense spared, and the home was an example of how incredible something can be when no corners are cut. 

The kitchen, designed and built by Bulthaup, is simply magnificent. The exposed wooden trusses in the ceiling are reclaimed and hundreds of years old, and juxtaposed with the modern and sleek lines create for a strikingly symmetric yet inviting space. Capturing this was tricky, as the powder-coated beam in the center of the home proved tricky to work around. However, that beam itself is a work of art - as it is this one column that supports the weight of the entire home. The entire downstairs is an open layout and flows seamlessly from space to space, something that's tricky to capture. In order to pull it off, we had to compose and light very carefully.


I may sound like a broken record here, but we were just awed by this home. The staircase, seen below, was entirely floating and not attached to any wall sans the outer radius. It was quite an engineering feat to pull off- and we worked hard to capture both the engineering and mood of this area. My stylist, Dana, who will be getting her own write up soon, stood in as a model for us, too.

The upstairs was quaint yet airy and light. Vaulted ceilings and an indoor-outdoor bedroom let the outside in effortlessly, though capturing it proved difficult. With such a difference in exposure between the ambient exterior light and interior light level, we had to find a way to balance both yet attain a natural and airy feel. With nowhere outside to put lights, I opted to composite this photograph which resulted in the perfect feel.

Lastly, a killer basement theatre was installed with - yet - again - reclaimed wood and tile throughout. Everywhere you turn in this house there's a story, from centuries-old reclaimed wood to tiles dating from the Napoleonic era of France, it was a pleasure to be allowed into this home for as long as we were and to take our time capturing all of the details and spaces throughout.

We've submitted this project to a number of shelter magazines, so hopefully in the coming months we'll have a few nice tearsheets to share. Till then...fingers crossed!

USA Today Article Featuring Photography at Wrath Winery

A few weeks ago I shot a number of photos at Wrath Wineries in the Santa Lucia Highlands, about 45 minutes inland from Carmel and Monterey. I am happy to report that one of the images, the twilight exterior, has been featured in a USA Today article detailing all the amazing wineries in this area. Pretty excited with the headline coverage, here, to be sure! You can read the entire article and see the image here (or by clicking on the article below). I've also linked back to a blog post detailing how I made the image, which can be read by clicking here.


Mpkelley.com architectural photography published in USA Today

Architectural Photography: Photographing Wrath Winery in Soledad, CA

Seems that these days a larger and larger percentage of my photography is taking place outside of Los Angeles, and I'm totally loving all of the new locations I'm getting to see on my travels. In addition to the Hahn Winery (seen in the below post) which I photographed, I also shot the Wrath Winery, also located in Soledad, CA, for a revamp of their marketing materials. Wrath is situated in the gorgeous Salinas valley, which makes for some very interesting lighting and fog effects at sunset. As the cool air from the Monterey Bay moves inland, it meets the warm air from the eastern side of the valley and condenses, creating a fog which rolls rapidly up the valley towards the vineyards we were in. While this caused me a bit of trouble while photographing Hahn, it made for a beautiful twilight down in the valley at Wrath. The clouds added great atmospherics and really let me play up the name of the winery - I felt like I could really push it with the processing on this, given the name, location, and lighting effects. 


This was lit with a combination of strobe and hot light - actually, scratch that - warm light - a Lowel GL-1, which doesn't really get hot like a traditional hot light, and is thus ten times easier to use for my style of photography. I've got the burn marks on my hands from regular hot lights to prove it. In addition to the GL-1, we had a series of PocketWizards set up in relay mode to help cover the enourmous distance between myself and the building. Due to the pond in front of me eating the radio signal, it took two or three PocketWizards to make it over there, but we finally got the system working flawlessly.

The interiors of the tasting room, which is located in downtown Carmel, were lit entirely with the Lowel GL-1 - I am beginning to love this light more and more everytime I use it, as it has replaced speedlights and inkies in a number of applications for me. I kept the GL-1 bare with no gel in an effort to bring out some of the richness and color in the natural wood interior. I just love the warm quality of light that we created throughout.

It took about 2.5 hours to create the three interior photographs - which was made tricky as a result of the tasting room being open for business, even though it was about 11am on a Monday. Thankfully, everyone was wonderfully accomodating and we even had a few people stop by to spectate and observe what was going on. Seems Carmel attracts a fair amount of hobbyist photographers who were keen to see the shoot in action.

All in all, this was one of my favorite shoots in recent memory. It's not often you get to set up a tripod in vineyards, enjoy an amazing sunset, taste plenty of great wine, and come home with four portfolio-quality photographs. Jobs like this are a reminder of why I love what I do!

Architectural Photography: Light Painting A Winery From a Half-Mile Away

I once again loaded up the car and headed away from Los Angeles to the Salinas Valley to photograph the Hahn and Wrath Wineries, both of which are located around an hour from Carmel in an amazing setting. Shooting these wineries presented a number of challenges, and I'm going to talk a little bit about how I overcame them. I know I've been on a bit of a hiatus lately, but hopefully this post makes up for it. 

First, let's talk about the shoot I did for Hahn Wineries in Soledad, CA. The client had a few ideas for shots that they knew they wanted, and they more or less left the rest up to me. I was given a tour of the grounds, and immediately settled on a few shots, and scratched my head over a few more. They had mentioned that they wanted a few great shots of their tasting room, which is one of their big attractions for visiting customers. The problem was that the tasting room is elevated about 20 feet off the ground on a steeply sloped hillside, and was entirely surrounded by trees on the high side. Any hopes of me creating an architecturally interesting photograph from the ground were quickly dashed, and my options seemed to be severely limited to either renting a helicopter (expensive) or using some extremely tall and unstable pole to shoot from the slanted ground below (a bad idea, and generally unsafe). 

While walking around and talking to the client, they pointed out a ridgeline on the other side of the valley where they often took customers on the tour to see the entire layout of the winery and its vineyards. I was initially reluctant to try to shoot from this vantage point, as the small size of the tasting room would require some serious telephoto reach and would eliminate nearly all of the architectural appeal of the building. On a whim, I asked if we could take a ride up to the ridgeline to see if we could gather any other shots, and it turned out to be a pretty great vantage point from which to shoot the tasting room. 

While I didn't end up zooming in that far (we ended up shooting at 50mm) the shot actually looked like it might work. While you lose some of the architectural details of the tasting room, you do get an incredible view of the grounds and the sense of scale becomes immediately evident. I made a decision to make the twilight shot more about the entire winery rather than just the tasting room, which I will admit was a little daring on my behalf. 

After choosing where to take the photo from, it was just a matter of playing the waiting game until sunset. Once dark enough, I had my assistant Jaron  head back to the tasting room armed with a big light and a walkie talkie.

Because of the distance involved and the fact that I was standing on the side of a valley, we weren't able to use PocketWizards to light the scene as I usually would. This was simply too far, and I didn't want to try to wrangle multiple PocketWizards in relay mode from my position, down to the valley floor, up the other side of the valley, and again to the tasting room. Too much time and effort for something that franky just didn't seem like it would work. So we tried another untested method - I would talk to Jaron on the walkie talkie, count backwards from three, and open the shutter for a long exposure. He would (ideally) then pop the flash manually while the shutter was open for the 3 or so seconds I'd set it to, and the sensor would record the flash pop. Here's one of the frames that was composited so you can see what I'm talking about:

I'm happy to say that we were somewhat succesful. For this exterior view, we delivered two shots - one with light trails, and one without. I wanted to give a sense that you might be able to take a sunset winery tour in the ATVs provided by the facility, and even though the client didn't request it, I thought it was a cool add-on with minimal work involved, so I threw it in anyway.


So, all that effort - do you think it was worth it? It's certainly a unique shot, the likes of which I don't have in my portfolio and it was something I don't think I'll be trying often. Another challenge for me was dealing with the fog that rolls into the valley and the haze that forms as a result. I'm not sure if it gives this photo a bit of mood and a sense of place, or if it just distracts. 

Below are a few more images from the job - my personal favorite is the image of the tasting room, shot with a Lowel GL-1 hotlight in complete darkness. 


Architectural Photography in Santa Barbara, CA: Private Residence by VFS Architecture

One of my favorite parts of California is Santa Barbara County, so it is always exciting to get sent on an assignment to shoot a project there. VFS Architects of New York contacted me to shoot a recently completed project for them in Santa Barbara, and I jumped at the chance. Santa Barbara is the definition of 'easy livin' - and it's not hard to see why. This gorgeous home was situated on top of a hill with views over the Pacific and Channel Islands, tucked away above the marine layer. 

The assignment was relatively simple, in the grand scheme of things, but required a bit of restraint due to client requests. A natural light look was desired, to make the home appear as relaxed and open as possible. While natural light sounds simple enough, there's often a large amount of shaping and refining that light to get it looking as good as it can for the camera. With the twilight shot (above) there was still a considerable amount of exterior lighting at play, from both hot light and strobe, in order to retain detail throughout. Even when applied very lightly, some supplemental lighting can go a long, long way to retain a natural feel and add depth and dimension to architecture.

So, even with the requested 'natural light' look, it still took us a full day to produce 8 images. We played quite a bit of a waiting game with the sun, waiting for it to get to just the right spot, and there was (as you can see) some whack-a-mole with the scrims going on to control and soften some of the highlights.


As a side note, while I do love putting together my twilight exterior images, I have to say that I've got quite a soft spot for showing architecture in late afternoon golden light, as seen below. There is just so much depth and texture that can be brought out when the sun is low on the horizon, bathing everything in a warm light. So much can be done to make an image warm, inviting, and dimensional just by waiting for the right light.

I think that this image (below) is my favorite from the shoot. It shows all of the home's significant architecture, the location, the feel, and the expanse of the property, something which is usually at a premium around Los Angeles and Southern California in general.

Lastly, a rear elevation shot at about 12' showing the architectural details of the back of the home:

Which is quite a semi-symmetrical feast for the eyes!


Upcoming Architectural Photography Tutorial DVD And Workshops With Fstoppers.com

Over the past few months, I've been scheming with Lee Morris and Patrick Hall of fstoppers.com to bring our combined talents together and produce a DVD/tutorial series on the subject of architectural photography. So in May and June of this year, I once again left Los Angeles and headed to Charleston, SC to begin production on the largest project I've been involved in to date. Working with local advertising agencies, we set up a series of shoots for varying clients all over the Charleston area and we were lucky enough to get them to allow us to film everything that went on. 

This is, for the most part, an entirely comprehensive tutorial. While it would be pretty impossible to teach EVERY single method of architectural photography, we did our best to cover the basics all the way through the more advanced techniques. We've got a chapter on shooting real estate and getting things right in the camera, for those who are just starting out with minimal gear. We've got a chapter shooting a home for one of Charleston's most well-known architects, where we dive into topics such as using natural light, staging a room, using scrims and subtractive lighting, light painting, and photoshop techniques to bring it all together. We've got a chapter dealing with commercial photography for restaurant interiors, as well as creating moody light painted scenes and controlling light from multiple sources to ensure that you can create a repeatable result in pretty much any situation that could ever arise. We got to shoot at some of Charleston's (and the country's) best restaurants - such as Husk, which has been voted the best new restaurant in America and has featured on many TV segments in the past few years. Very, very exciting stuff! 

Each image in the tutorial was designed to teach a technique, so keep that in mind while viewing. We wanted to show you a myriad of options for creating your own awesome architectural images, so we really pulled out all the stops and went to down wherever possible. Even if we didn't need to do it for a certain image, we included the technique anyway, just to give you as many options as possible for soliving problems that you'll face on any given architectural or interior shoot.

And here's the most exciting part of all of this. We've decided to release one of the shots - a dusk light painted exterior - with the DVD. That means you'll get the PSD files and you'll be able to follow right along as I edit the file in the tutorial. You'll be able to create an image exactly as I am, folllowing my every move - learning my techniques exactly in the method that I use them. No stone will be left unturned, as I wanted this to be an entirely comprehensive tutorial. 


Above, I've included a few of the images that we're going to walk you through step-by-step. All told, we shot over 20 images and it looks like at least fifteen of them are going to make it into the final cut. Each of them teaches a different technique - from light painting, to dealing with tricky color casts, to adding artificial light through windows, fixing pesky window views and ensuring that you can see whatever you want to see out a window, balancing light at different times of day, and so on and so forth. I'm really, really excited about this project, and I can't wait to see it released. 

As of right now, we're planning for a fall 2013 release; definitely before the new year. Keep your eyes peeled for more details, which I'll release as we get closer to completion. We've also got a number of promotional videos in the works that I'll post and share, as well!

More to come...looking forward to it all! 

Architectural Photography in Phoenix, AZ: Desert Landscapes And Pastel Colors

One of the best things about being an architectural photographer is definitely the amount that I get to travel. I recently packed up the car, blew Los Angeles a kiss, and headed to Phoenix, Arizona for a week to photograph five custom homes by a builder based in Scottsdale. The client, C5 Builders, was looking to improve their advertising presence by upping the quality of their photographs.


While these homes were finished between 2005 and 2011, they didn't look dated to my eyes at all. They were such a breath of fresh air to photograph:  low, flat roofs and plenty of clean lines make for an architectural photographers' paradise. My favorite thing about these homes were definitely the exteriors. While here in LA we're blessed with plenty of interesting exteriors, it's great to shoot a totally different style, and Phoenix has plenty of unique exteriors due to its climate and the desire of many architects to integrate the home into the desert landscape in such a way to not disturb it at all. Many of the homes are planned to precisely follow the existing landscape - in many areas, it is forbidden to dig more than a foot or two into the ground, and you are encouraged to build around the beautiful Saguaro cacti that populate the area. If you need to remove one, you must replant it locally, and in many cases homes are designed entirely around old growth Saguaros because of the delicate arms. It's much, much easier to relocate the young Saguaros, or spears as they are known, due to their lack of arms. If you must move one of the big guys, it takes tons of special equipment and is often done at great cost. 


Photographing out here definitely requires a number of alterations to workflow, as well. Because we were shooting in the spring, which is apparently the season when Rattlesnakes are the most active - we were always on the lookout (and the listenout, if you will) for that signature rattling sound. In many cases my tripod was set up in untamed desert - not many people buy into the whole concept of a manicured lawn in Phoenix - and plenty of small wildlife darted in and out of my tripod legs. It was definitely something that sat in my mind the entire time, which isn't helped by the fact that I have miserable hearing to begin with. 

Another challenge, not only to building these homes, but to shooting them as well - is, of course, the cacti that are everywhere. I'd been to Scottsdale before, but I didn't venture too far out into the desert, so I wasn't really worried about running into a cactus. However, on this trip, there were plenty of occasion where I was setting up right in the middle of a grove of cacti. It was on my second shoot of the week where I learned pretty quickly that I needed to be super, super careful where I was walking. I was taking some daylight exteriors of one home and inadvertantly brushed my left hand against a Jumping Cholla (click here for more info). Anyone familiar with these will tell you what an absolute pain in the butt they are. The thorns are covered in microscopic barbs which run in an opposite direction, so once they're in your skin, it takes one hell of a yank to get them out, which just tears up your skin even more. Since the needles are very thin and grow in clumps, once you get one stuck on your hand, you're pretty much screwed. It took about a half an hour to remove 30-some Cholla needles from my hand, and by the time the ordeal was over, my hand was shaking uncontrollably and there was enough blood on it to make an impromptu trip to donate it at the nearest Red Cross. In the heat of the moment, I totally forgot to get a picture - next time, I'll be sure to, though I'm secretly hoping there never is a next time. Ouch.

Despite the blood, sweat, and tears (first time I've ever used that expression literally), I was extremely happy with the images created on the trip. Once again, I had to adhere to a grueling shooting schedule - five homes in five days, and when all was said and done I'd shot over 60 gigabytes of material. 


Before, after, and plenty of Saguaros...

My definite favorites are the exteriors, since like I said, these are all so unique and I don't get to see anything like it in Los Angeles. A few of them underwent rather drastic changing in post-processing, as it seemed that clouds threatened the shoot every night. There were a couple nights where the gathering clouds made for some dramatic pastel sunsets which were great (as in the first couple images) but for a few nights the cloud cover was completely blocking any color from the sky, which something I definitely wasn't prepared for as Phoenix is one of the hottest and driest places I've ever shot. Just goes to show you that you can never depend on anything, even when you're shooting in the desert and blue skies are the norm. 

Before and after, with some Phoenician clouds...


That's why I always preach that good skills with post processing and lighting can get you out of a bind - together those skills will ensure that you can deliver the results you want EVERY. TIME. Especially when clients are counting on it and you've traveled a good six hours from home to do it...

In addition to all of my rambling, I'm happy to announce that I've partnered with Fstoppers.com to release a ton of behind-the-scenes footage from my trip to Phoenix. It's in post production right now - and as I type this, we're putting the finishing touches on it. I had no idea how long it would take to cut together a fifteen minute long behind the scenes video, but we're getting there! So apologies for the wait - as it's been about two months in the making. Til next time...when I fly across the country and experience some Southern Hospitality!