technical

Photographing Every Departure at LAX's South Complex: "Wake Turbulence"

I just spent about 16 hours shooting and putting this image together, and I've written a little blog post, below, detailing some background information and how I did it. While not specifically related to architectural photography, I still find it interesting enough to write and post about, so you'll have to tolerate the tangent this week.

PurePhoto, who sells all of my fine art works, has graciously agreed to offer prints of the shot in 18x36", 27x48", and 36x64" sizes on Hahnemuhle archival fine art paper. I have to say, the shot is truly stunning in large format and anyone who appreciates aviation, infrastructure, travel or imagination could easily spend countless hours getting lost in it. To order prints and view availability, click hereor head to my galleries on PurePhoto.

Los Angeles is a city steeped in aviation history and technology. Over the years, Los Angeles and Southern California have played host to some of the largest aviation companies and activities the world has ever seen. From designing and building Lockheed's top-secret reconnaissance planes to building some of the first large-scale passenger aircraft and having Maverick buzz the tower only a shrot drive south at Mirarmar, aviation is everywhere in this region. Our main airport, Los Angeles International (LAX) is one of the busiest airports in the world and countless airlines use it as a focus city for both international and domestic operations. 

The idea for this photo wasn't some grand thing years in the making, or planned over months. It was simply a clear day in LA and I felt like a total dork sitting inside on the computer. I had to do something. The day before, I was with my friend David Huff at LAX for lunch and some plane-watching, but the smog was out in force so nothing too special happened in terms of photography that day. Since I am generally interested in making photographs that aren't just snapshots of a single moment, I had a thought that it would be interesting if I could seem to capture more than one plane in flight at once. And from there, this idea was born.

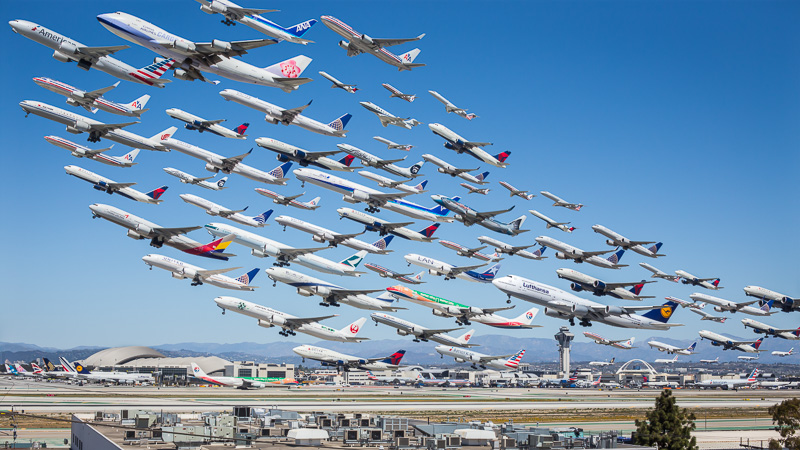
This has been done before, yet slightly differently. Ho-Yeol Ryu created a similar piece set at Hannover airport. This showed that what I wanted to do could be done, albeit quite differently. Ryu used planes of all liveries and countries, and took a bit more of an artistic approach in his rendering. My intent was to capture only planes that flew out of LAX - highlighting and emphasizing what an incredible airport that this city has. It's really fascinating to look at all the planes heading in different directions, ferrying people all over the world, all originating from Los Angeles. In this shot alone, there are planes heading to destinations on six continents - either direct or via multi-stop routes on the same flight number. Guangzhou, Auckland, Frankfurt.

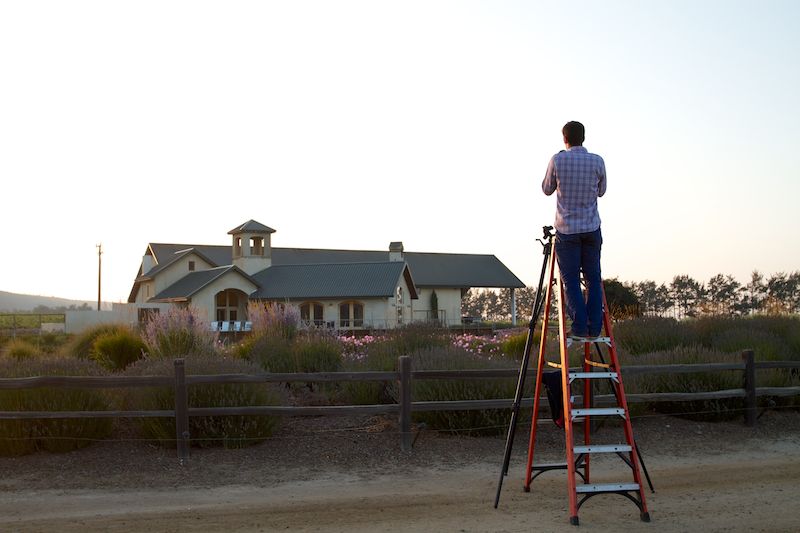
In order to capture the shot, I set up a tripod and photographed every single plane that flew across my frame anywhere from 3 to 10 times. Using sandbags to ensure that the camera didn't move and coming as close to peeing myself as I ever have in my 26 years of existence from not wanting to leave my camera unattended, this resulted in over 400 images from which the composition is built, but not all of them were used. Here are a few of the individual, completely unedited, frames that I used to put the entire thing together, so you can get an idea of how many different frames it took!

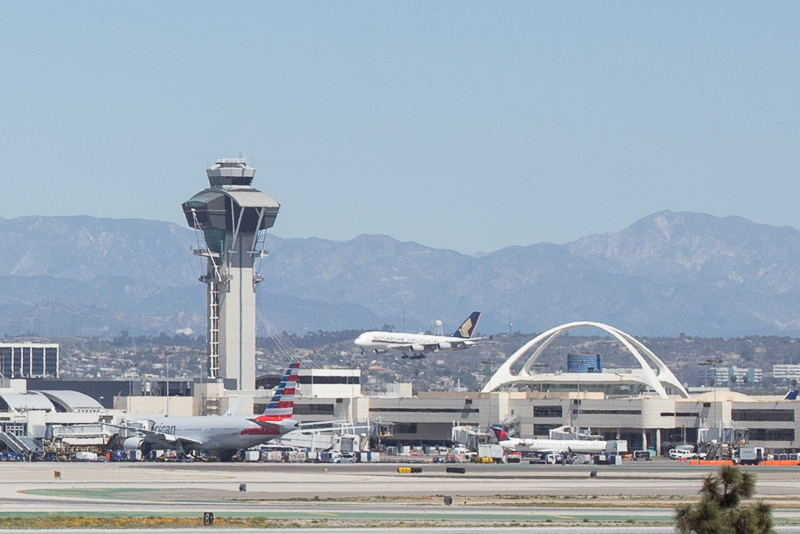
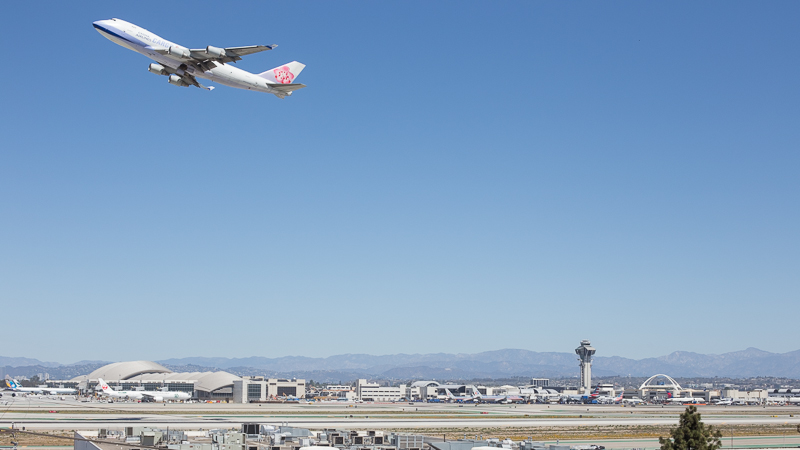
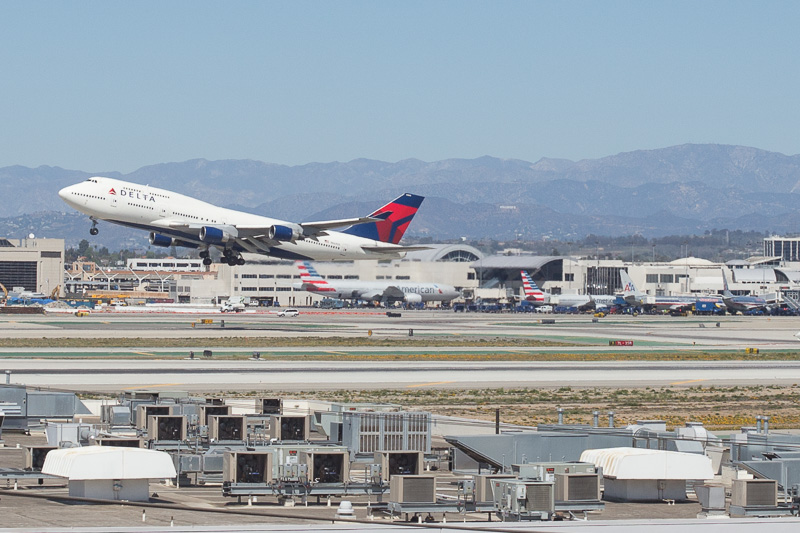
As you can see there were a number of issues to contend with. Heat haze, the changing angle of the sun, and other traffic on the ramp all had to be mitigated. The best way I found to do this was using masks and selections in photoshop to isolate every single plane in the final image and then piece them all together one by one, nudging them slightly so that they all lined up. I took some liberties with the positioning of each of the planes in order to make a more compositionally interesting photo. True aviation geeks may say this is sacrilegious, but it makes for a more interesting and easy to view shot. Everything is still somewhat accurate in terms of pitch angle and takeoff sequences, but like I said, in order to make it 'read,' I had to take some liberties. 

And that's how it was done! PurePhoto, who sells all of my fine art works, has graciously agreed to offer prints of the shot in 18x36", 27x48", and 36x64" sizes on Hahnemuhle archival fine art paper. I have to say, the shot is truly stunning in large format and anyone who appreciates aviation, infrastructure, travel or imagination could easily spend countless hours getting lost in it. To order prints and view availability, click here or head to my galleries on PurePhoto.

Still with me? Here's an interesting aside. At the time of writing this post, this image has received over 350,000 unique hits on reddit, totalling over 110gb in bandwidth. This makes it the most popular aviation-related in image in reddit history! Not bad, for a nerd like me.

Aerial Photography Over Los Angeles: Shooting The City's Architecture From Above

Of course there are thousands of ways to photograph architecture from ground level, but an entirely different feel can be conveyed by photographing from the air. I've taken a few trips recently in a chartered Robinson R-44 to photograph homes in the LA area, and I've also taken some time to create images that I will sell as prints in a few interior design outlets and chains throughout California. 

Being such a huge aviation geek, shooting from the air is a total treat. Hanging out of a helicopter at a thousand feet, cruising at 80 knots with the door removed and the wind blasting by is always such a rush. There are a few things you have to keep in mind, of course, as this is an entirely different environment compared to shooting on the ground. No lens hoods, as the 80+mph wind would rip them right off if the lens poked beyond the canopy glass. You can't change lenses, because the slightest fumble would result in a very expensive drop (those cabins are TIGHT, and with all the wind and bouncing around it would be very easy to drop something and lose a lens, or kill someone below) and you have to know exactly what you want to shoot before heading up. At the low price of 10 cubic dollars per minute, loitering to get the right angle or find the right house is going to cost you. Pre-flight planning is super important! You want the right light, the right weather, the right orientation, the right elevation, and the right composition. A big ask!

Of course, it all takes a skilled pilot to get you where you want to go on the first try. It's best to work with someone who has flown a photographer before and understands their needs with regard to light, timing, altitude, and so on. None of this would have happened without the understanding and patience of my pilot, who is able to manage all of my ridiculous photographer demands (up! down! left! right! do an orbit down there!) on top of dealing with the insanity that is LA airspace. 

But what I'm most excited about aren't the photos of homes that I've been doing (which, make no mistake, are hugely enjoyable and I love the results) but the photos that result when I let my creative juices flow a bit. A few weeks ago, there was a relatively large forest fire on the outskirts of Los Angeles. Knowing that this low-lying white, diffuse smoke could make for some fleeting and ethereal shots, I decided it would be a great time to get up in the air. Luckily, the conditions didn't disappoint at all. It was an expensive gamble, but one that definitely paid off. I don't think I've ever seen photos of Los Angeles that look just like this - which is something I always strive for. Why make the same photos of the same landmarks that everyone else has done a million times? 

The conditions have to be right, but when everything comes together, the results are very unique. I'm selling prints of these images at HD Buttercup in Los Angeles, as well as on www.purephoto.com - where you can also see most of my personal work for sale.


Stay tuned for more - as I have a few more flights planned in the coming months, both in LA and in other areas. I'll be revamping my website shortly, too, with dedicated galleries for many of my photos which haven't seen the light of day. Lots of exciting things on the horizon here.

Photographing a Modern Office Interior in Orange County: Ferm Design Concepts

Back in October, I had the pleasure of working with one of my favorite clients, Kelly Ferm of Ferm Design Concepts and 707 Circle Lane to photograph an office interior she designed for local Orange County startup InsuranceOnline.com. Shot over the course of just a few hours - we had to be quick in order to not interfere with the day-to-day operations of the business, which was full of workers running around and getting things done! 

The waiting room, below, lit with hot and strobe light brought out the softness in the wood and smoothly curved white armchairs. By adding shadow and highlight we were able to add plenty of depth and interest in a room lit with only overhead can fluorescents for practicals. I strive to take places like this - with interesting interior design, yet fairly standard overhead office lighting - and transform them into a soft, inviting, and flattering image that presents my clients' work better than any snapshot could.


Up next, a simple conference room and break room - but bringing softness and richness to the design is a bit tricky when dealing with just ovehead fluoros. The camera doesn't quite see what the eye does, so plenty of massaging with light is necessary. Those conference room windows were heavily tinted blue, and required some serious gelling of the lights to make it all match. 

And lastly, my favorite shot from the day, and a very impromptu one at that, shot as most of the workers were at lunch. I saw this angle upon walking in and wanted to shoot it, but pulling it off would be tough. We only had about 20 minutes or so to clean, organize, stage, and light the space, which of course was tricky. Working with an assistant, we hid everything we could, arrange the desks and computers as best as possible, had a few workers stand in for models to give some life and activity, threw a couple lights up, mostly in a seat-of-the-pants fashion, and let it ride. What resulted is one of my favorite shots in recent memory. Even a simple office interior can photograph incredibly well if the architecture lends itself to it. 


And this shot, as it turns out, lent itself to a very nice black and white conversion, which I find quite reminiscent of a few shots of Julius Shulman's. A classic, contrasty one point perspective which draws the eye in and lets you linger. Thanks, Kelly, for the great subject and chance to make some killer photos!


You'll have to excuse my lack of blogging lately, as I have been busier than ever and all over the west coast photographing (nearly 4,000 miles driven in the last two months alone) a number of different projects. Expect a lot more posts as this cools down and the holidays come up.


How To Photograph Real Estate, Interiors, And Architecture: Where Art Meets Architecture

After over six months in production, I am happy to announce that my tutorial 'Where Art Meets Architecture: How To Photograph Real Estate, Architecture, and Interiors' is finally available! I partnered up with Fstoppers.com to create a comprehensive eight-hour tutorial which covers so many facets of architectural and interior shooting.  I wanted to give my readers and followers the first chance to purchase the tutorial, which is available for $299 (click here), before it goes open to the public, pending Fstoppers.com's migration to a new server this week.

I will explain each and every technique that I use to produce my photographs. The full photography tutorial is broken down into three chapters, each covering the tools necessary to succeed in the different niche markets within the field of interior photography. So no matter if you are an experienced photographer or have never taken your camera out of auto mode, I'll take you from shooting basic bedrooms all the way through my complicated light-painted exteriors. 

We've created a ten-minute trailer for the tutorial, which breaks down everything inside it and gives a brief look into my workflow, which can be seen here:


Here's what I cover throughout the tutorial:

Real Estate Photography: In the Real Estate section, I take the time to teach you everything you need to know about this genre so you can kick start your career and start producing images for real estate agents, listing agents, and general property management. All of the basics will be covered in this chapter including:

  • How to get started with minimal gear
  • How to bounce flash effectively
  • Using natural light to your advantage
  • Properly composing your frame
  • Choosing the correct focal length
  • How to retain exterior window views
  • Two, three, and four light setups
  • Correcting pincushion and barrel distortion
  • Fixing converging lines in Photoshop
  • Creating a final image completely in camera

 
In addition to getting started, I'll also talk candidly about how I have found success in the real estate market, and how you too can build a money making business shooting properties for sale.

Architecture and Interior Photography: This chapter focuses on how to create photographs for higher paying clients like architects, home builders, interior designers, and magazine editorials. With the ground work already laid down, I will focus on streamlining your workflow and pushing your images into actual works of art. While on location at an actual architect’s personal home, I'll take you step-by-step through eight flagship images from initial capture all the way through the final photoshop editing process. We have also included a full Photoshop PSD file of a twilight exterior images so you can follow along as we go through photoshop.

  • Twilight Exterior Technique
  • Advanced light painting and compositing
  • Tethering to an ipad/iphone
  • Using scrims  and flags to control reflections/specular highlights
  • The “Moody Interior Twilight Shot”
  • Faking warm sunlight
  • Staging furniture for strong compositions


Commercial and Advertising Photography
: In this final section, I'll take you on the set of two commercial spaces and demonstrate how to produce perfect images for restaurants, hotels, wedding venues, resorts, and other commercial clients. Emphasis will be placed on meeting your clients needs and lighting images according to the use of the space.

  • Creating twilight images while a restaurant is open for business
  • Incorporating people into your photography
  • Lighting multi room locations
  • Replacing details in Photoshop
  • Lighting large banquet halls
  • How to create an inviting atmosphere

 
In addition, I also touch on commercial project pricing, licensing, and dealing with clients in a way that keeps everyone happy and creative energy high.

If you are interested in purchasing the DVD, you can click here, which will take you to our e-junkie store, where it is available for $299, which in my opinion is a great value. I have watched it a few times and every time I watch it I think about what a steal it is! It took me years to figure all of this out and to hone my craft to the point that its at today. Unfortunately, my partner, Fstoppers.com has been absolutely slammed with traffic from a few of our posts that went viral, which we are working on getting fixed right now, and I am releasing this to just my loyal followers until it goes public at the end of the week.

I hope you like what you see - we've gotten a handful of glowingly positive reviews from watchers, which is great to see after all of the work that went into it. If you have any questions at all, feel free to shoot me an email or reply to this post and I'll get back to you!


Architectural Photography: Photographing Wrath Winery in Soledad, CA

Seems that these days a larger and larger percentage of my photography is taking place outside of Los Angeles, and I'm totally loving all of the new locations I'm getting to see on my travels. In addition to the Hahn Winery (seen in the below post) which I photographed, I also shot the Wrath Winery, also located in Soledad, CA, for a revamp of their marketing materials. Wrath is situated in the gorgeous Salinas valley, which makes for some very interesting lighting and fog effects at sunset. As the cool air from the Monterey Bay moves inland, it meets the warm air from the eastern side of the valley and condenses, creating a fog which rolls rapidly up the valley towards the vineyards we were in. While this caused me a bit of trouble while photographing Hahn, it made for a beautiful twilight down in the valley at Wrath. The clouds added great atmospherics and really let me play up the name of the winery - I felt like I could really push it with the processing on this, given the name, location, and lighting effects. 


This was lit with a combination of strobe and hot light - actually, scratch that - warm light - a Lowel GL-1, which doesn't really get hot like a traditional hot light, and is thus ten times easier to use for my style of photography. I've got the burn marks on my hands from regular hot lights to prove it. In addition to the GL-1, we had a series of PocketWizards set up in relay mode to help cover the enourmous distance between myself and the building. Due to the pond in front of me eating the radio signal, it took two or three PocketWizards to make it over there, but we finally got the system working flawlessly.

The interiors of the tasting room, which is located in downtown Carmel, were lit entirely with the Lowel GL-1 - I am beginning to love this light more and more everytime I use it, as it has replaced speedlights and inkies in a number of applications for me. I kept the GL-1 bare with no gel in an effort to bring out some of the richness and color in the natural wood interior. I just love the warm quality of light that we created throughout.

It took about 2.5 hours to create the three interior photographs - which was made tricky as a result of the tasting room being open for business, even though it was about 11am on a Monday. Thankfully, everyone was wonderfully accomodating and we even had a few people stop by to spectate and observe what was going on. Seems Carmel attracts a fair amount of hobbyist photographers who were keen to see the shoot in action.

All in all, this was one of my favorite shoots in recent memory. It's not often you get to set up a tripod in vineyards, enjoy an amazing sunset, taste plenty of great wine, and come home with four portfolio-quality photographs. Jobs like this are a reminder of why I love what I do!

Architectural Photography: Light Painting A Winery From a Half-Mile Away

I once again loaded up the car and headed away from Los Angeles to the Salinas Valley to photograph the Hahn and Wrath Wineries, both of which are located around an hour from Carmel in an amazing setting. Shooting these wineries presented a number of challenges, and I'm going to talk a little bit about how I overcame them. I know I've been on a bit of a hiatus lately, but hopefully this post makes up for it. 

First, let's talk about the shoot I did for Hahn Wineries in Soledad, CA. The client had a few ideas for shots that they knew they wanted, and they more or less left the rest up to me. I was given a tour of the grounds, and immediately settled on a few shots, and scratched my head over a few more. They had mentioned that they wanted a few great shots of their tasting room, which is one of their big attractions for visiting customers. The problem was that the tasting room is elevated about 20 feet off the ground on a steeply sloped hillside, and was entirely surrounded by trees on the high side. Any hopes of me creating an architecturally interesting photograph from the ground were quickly dashed, and my options seemed to be severely limited to either renting a helicopter (expensive) or using some extremely tall and unstable pole to shoot from the slanted ground below (a bad idea, and generally unsafe). 

While walking around and talking to the client, they pointed out a ridgeline on the other side of the valley where they often took customers on the tour to see the entire layout of the winery and its vineyards. I was initially reluctant to try to shoot from this vantage point, as the small size of the tasting room would require some serious telephoto reach and would eliminate nearly all of the architectural appeal of the building. On a whim, I asked if we could take a ride up to the ridgeline to see if we could gather any other shots, and it turned out to be a pretty great vantage point from which to shoot the tasting room. 

While I didn't end up zooming in that far (we ended up shooting at 50mm) the shot actually looked like it might work. While you lose some of the architectural details of the tasting room, you do get an incredible view of the grounds and the sense of scale becomes immediately evident. I made a decision to make the twilight shot more about the entire winery rather than just the tasting room, which I will admit was a little daring on my behalf. 

After choosing where to take the photo from, it was just a matter of playing the waiting game until sunset. Once dark enough, I had my assistant Jaron  head back to the tasting room armed with a big light and a walkie talkie.

Because of the distance involved and the fact that I was standing on the side of a valley, we weren't able to use PocketWizards to light the scene as I usually would. This was simply too far, and I didn't want to try to wrangle multiple PocketWizards in relay mode from my position, down to the valley floor, up the other side of the valley, and again to the tasting room. Too much time and effort for something that franky just didn't seem like it would work. So we tried another untested method - I would talk to Jaron on the walkie talkie, count backwards from three, and open the shutter for a long exposure. He would (ideally) then pop the flash manually while the shutter was open for the 3 or so seconds I'd set it to, and the sensor would record the flash pop. Here's one of the frames that was composited so you can see what I'm talking about:

I'm happy to say that we were somewhat succesful. For this exterior view, we delivered two shots - one with light trails, and one without. I wanted to give a sense that you might be able to take a sunset winery tour in the ATVs provided by the facility, and even though the client didn't request it, I thought it was a cool add-on with minimal work involved, so I threw it in anyway.


So, all that effort - do you think it was worth it? It's certainly a unique shot, the likes of which I don't have in my portfolio and it was something I don't think I'll be trying often. Another challenge for me was dealing with the fog that rolls into the valley and the haze that forms as a result. I'm not sure if it gives this photo a bit of mood and a sense of place, or if it just distracts. 

Below are a few more images from the job - my personal favorite is the image of the tasting room, shot with a Lowel GL-1 hotlight in complete darkness. 


Upcoming Architectural Photography Tutorial DVD And Workshops With Fstoppers.com

Over the past few months, I've been scheming with Lee Morris and Patrick Hall of fstoppers.com to bring our combined talents together and produce a DVD/tutorial series on the subject of architectural photography. So in May and June of this year, I once again left Los Angeles and headed to Charleston, SC to begin production on the largest project I've been involved in to date. Working with local advertising agencies, we set up a series of shoots for varying clients all over the Charleston area and we were lucky enough to get them to allow us to film everything that went on. 

This is, for the most part, an entirely comprehensive tutorial. While it would be pretty impossible to teach EVERY single method of architectural photography, we did our best to cover the basics all the way through the more advanced techniques. We've got a chapter on shooting real estate and getting things right in the camera, for those who are just starting out with minimal gear. We've got a chapter shooting a home for one of Charleston's most well-known architects, where we dive into topics such as using natural light, staging a room, using scrims and subtractive lighting, light painting, and photoshop techniques to bring it all together. We've got a chapter dealing with commercial photography for restaurant interiors, as well as creating moody light painted scenes and controlling light from multiple sources to ensure that you can create a repeatable result in pretty much any situation that could ever arise. We got to shoot at some of Charleston's (and the country's) best restaurants - such as Husk, which has been voted the best new restaurant in America and has featured on many TV segments in the past few years. Very, very exciting stuff! 

Each image in the tutorial was designed to teach a technique, so keep that in mind while viewing. We wanted to show you a myriad of options for creating your own awesome architectural images, so we really pulled out all the stops and went to down wherever possible. Even if we didn't need to do it for a certain image, we included the technique anyway, just to give you as many options as possible for soliving problems that you'll face on any given architectural or interior shoot.

And here's the most exciting part of all of this. We've decided to release one of the shots - a dusk light painted exterior - with the DVD. That means you'll get the PSD files and you'll be able to follow right along as I edit the file in the tutorial. You'll be able to create an image exactly as I am, folllowing my every move - learning my techniques exactly in the method that I use them. No stone will be left unturned, as I wanted this to be an entirely comprehensive tutorial. 


Above, I've included a few of the images that we're going to walk you through step-by-step. All told, we shot over 20 images and it looks like at least fifteen of them are going to make it into the final cut. Each of them teaches a different technique - from light painting, to dealing with tricky color casts, to adding artificial light through windows, fixing pesky window views and ensuring that you can see whatever you want to see out a window, balancing light at different times of day, and so on and so forth. I'm really, really excited about this project, and I can't wait to see it released. 

As of right now, we're planning for a fall 2013 release; definitely before the new year. Keep your eyes peeled for more details, which I'll release as we get closer to completion. We've also got a number of promotional videos in the works that I'll post and share, as well!

More to come...looking forward to it all! 

Photographing The Robb Report 2013 Ultimate Home

About a year ago, I was contacted by a few potential clients who wanted to get together and discuss the possibility of shooting a home still under construction. Of course - it sounded like any run of the mill project and the meeting would be a simple brainstorming session of ideas, finding out what angles and features to shoot, and figuring out the optimal time of day(s) to shoot the home. 

I was incredibly surprised when I drove up to the location and first laid my eyes on the home that we would be shooting. A 26,000 square foot, completely custom Italian/Tuscan villa that sat on top of its own private hill with gated access points and what could best be described as castle walls all around. Simply incredible! I've seent a lot of homes and it takes quite a bit to get a big reaction out of me, but this was unlike anything I'd ever seen. The detail and finish work were exquisite. For example, each of the coppi tiles on the roof were salvaged from Italy, and they were hand made hundreds of years ago by artisans who formed them by pressing them over their legs. 

No expense was spared inside, either. The kitchen featured a custom La Cornue range, and the home sported an 8,000 square foot subterranean garage to keep the homeowner's collection in order. Lamborghinis, Ferraris, Teslas, Bentleys, the list goes on, it was all here. There were even a few lifts so that the owner could work on his own cars if he desired. 

Many of the furnishings and finishings were imported from Europe by the owners when they went on shopping trips, and original old-world artwork adorned the walls. A custom movie theatre with a glass floor looking onto the garage below was a rather interesting touch, as was a spiral staircase spanning three floors with an absolutely incredible handcrafted candelebra at the top. I could sit here for days typing out the things about this house that blew me away, but I'll let you take a look for yourself (above and below).

Photoragraphing this place was a pretty daunting challenge. The dark ceilings and walls sucked up a lot of light, and in order to keep things looking natural, a lot of exposure blending and clever (to me, at least) lighting tricks were employed. I didn't want to overlight the place or give it a sort of casino vibe, so I scaled back some of my usual lighting and retouching processes. There were, however, a few rooms that called for that dramatic lit look, such as the theatre and bar at the end of the garage. 

I think knowing when to light and embellish a space and when to hold back and let it speak for itself is such an important part of architectural photography - there's gotta be a rhyme and reason for doing something, though. If a kitchen has a really great ambient feel with big windows and white surfaces, why kill that mood to make it look like a casino? On the other side of the coin, however, when we're shooting a dark room with lots of mood, why not add some light to bring out the sexiness and feel? It's all subjective, of course, but making the space look as good as it can is what I try to do in every situation. If it looks best light and airy, keep it light and airy, and if it needs some mood, light away! Of course, there are many interiors where there needs to be a happy medium between natural light and artificial light. I'm sure you can tell which photos employed almost all natural light, which employed lots of artificial light, and which were a mixture of both.

When all was said and done, I delivered roughly 50 images of the home shot over the course of three days. The planning aspect of a shoot of this scale can't really be underestimated - early mornings, late nights, and plenty of negotiating 'best times' with the homeowner, clients, and weather made sure that I had my work cut out for me.

If you are interested in reading further about the home or seeing more images of the home, be sure to pick up an April 2013 issue of Robb Report.

Historic Architectural Photography: Photographing a Beverly Hills Architectural Icon

Over the past few months, I've been working with the Beverly Hills Historic Preservation Society to photograph historical or otherwise significant pieces of architecture throughout Beverly Hills in an effort to raise awareness of the city's incredibly diverse architecture and the inherent beauty it contains. I've never been an enormous architectural buff or lover of obscure architecture, but I'd be kidding you if I said I haven't started to appreciate the incredible pieces of architecture that can be found throughout LA. While I don't really subscribe to the current 'Beverly Hills' lifestyle (nor do I think I ever will), to be able to work in and see these locations is really something special and I've often got to pinch myself to make sure that this is really happening.

Many years ago, before the influx of people and massive population growth in the Los Angeles area, these homes were crafted with incredible and often painstaking attention to detail and beauty. It unfortunately seems that the homes built in the area today are rather cookie cutter in comparison, and I must say that I really prefer the Beverly Hills of old, all of these homes so full of character and charm, and I very much enjoy being able to raise awareness and show people that there's a bit more to Beverly Hills than the polished and uppity Beverly Hills that we often hear about. Anyway, that's enough rambling for now.

This home in particular is the Locke House, and it lies at the intersection of Rodeo and Lomitas. To celebrate this home's recent inclusion on the list of protected Beverly Hills historic landmarks, a shoot was commissioned and I was so excited to be able to have the opportunity to photograph something so different to what I usually do. It was just a couple of months ago that I was photographing an incredible Greene & Greene home in Pasadena, also of enormous historical signifigance. I'm finding a real affinity for these old homes - there is just nothing like them being built today, and they present a unique series of challenges when it comes to photographing them due to their old layouts and architectural quirks.

Anyway, lets get on to the fun stuff. For this shoot, I used a Manfrotto 3258 for the first time - I think some markets call it a 161MK2B. Whatever it is, I digress, there are a bunch of arbitrary numbers and it's a tripod. It was my first time using this thing - and if you'll notice, it's ABSOLUTELY HUGE! I have been looking for awhile to pick up one of these tripods to get a little bit of elevation in my shots, which is an enormous hurdle to jump. First, I've got to ensure absolutely perfect stillness over the course of hours, which gets exponentially harder the larger the tripod is because the longer legs are susceptible to more torsion and twisting, and the same amount of weight on top of longer legs is easier to move around if they aren't reinforced, and on and on, and something about physics and motion arms that would bore the hell out of you. I wasn't too keen on paying for scissor lifts or Grad-Alls to get elevation, plus they incur a permitting nightmare when you're working in LA, so this tripod seemed to fit the bill perfectly. At maximum extension I can get up to a little over ten feet by my estimating skills. Here's a picture of me on a ladder trying not to hurt myself as I balance up there adjusting settings:

Nerd in the wild!

After I set up the composition and figured out just how to set up this enormity of a tripod, we kicked around and waited for the light to fall so we could add our light and get all of the elements we needed to make the image happen. We were treated to what must have been one of the most spectacular sunsets I've ever seen, which actually just looked TOO good for the final image. I don't want the skies to distract, but rather to add to the image, and while this was simply incredible to witness, it was far too much to use in the final image.

What I ended up using for the final image were some sunsets captured the same night, but in different directions - here you can see how I ended up compositing them and delivering them to the client to pick what she liked best. One of the best parts of creating images the way I do is the amount of control I have over every aspect of an image. Want a different sky? No problem. Different color balance? You got it.

I was perosnally absolutely in love with the top image - it just embodies my personal mantra of 'possible, but unlikely,' striking the perfect balance between an image that is over-edited to the point of being unbelievable, but yet edited enough to instantly grab your attention and let you believe that I captured something that can happen in real life. Here's the final image in all of its glory, which I proudly threw almost immediately into my portfolio.

This is quite a departure from our initial test shot, seen below, and a great example of why it takes so long to create one of my images. Three hours on location and eight hours in post were what went into this shot, and I feel it was worth every second. The client got an image that they won't forget, the homeowner was thrilled, and we presented a unique piece of Beverly Hills in an awesome light that will hopefully get people excited about architectural gems like this.


Interiors Photography: Using Artificial Light To Create Mood And Remove Color Casts

Here is an example of what artificial light can do for an interior photo. While there are many instances where natural light may be all you need, this is a relatively common scenario that I see interior shooters struggling with on a regular basis. 

If you look at the natural light photo, it may look okay at first glance. It's a beautifully appointed, well-staged room, and the composition is as good as it can get owing to obstacles out of the frame blocking any other compositions.
 

But then take a look at the image (below) where I used a healthy dose of artificial light. The true colors of the room immediately come out - the paint no longer has a sickly green cast from the grass outside, the furnishings are their intended colors, and the contrast of the room has improved ten fold. Not to mention the feel that artificial light is able to create - there would be no way to create this Sunday-morning feel using only natural light. HDR would yield a muddy mess, especially in such a high contrast situation, and attempting to use only a single exposure would be a disaster, as illustrated above.
 

So not only does artificial light create a room with correct colors and contrast, but it also lets us entirely change the mood of the photo - something that natural light alone would never allow us to do. And isn't that our job as photographers? To make a space look as good as possible? To want the viewer to say - 'I want that - to be there, soaking up that sun with my coffee and paper!' One of the best things an interior photographer can do for his or herself would be to master not only available light photography, but also to learn how to create emotion via the use of artificial light.